I moved to a new URL! Check it out!

Otter Example: Shaders

Otter Example: Shaders
Welcome to shader town! One of the most exciting things about transitioning from flash to SFML was the use of GLSL shaders! Otter supports all the cool shader stuff that SFML does, and this example covers how to apply shaders to an image.

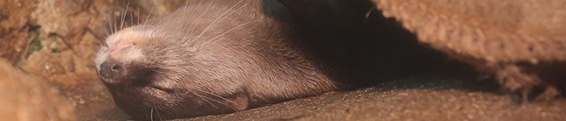
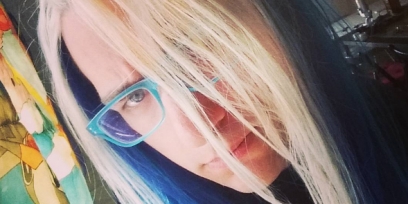
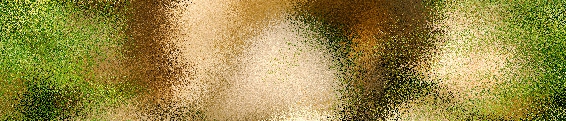
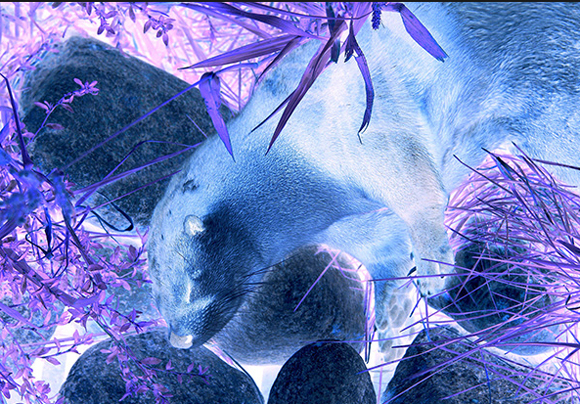
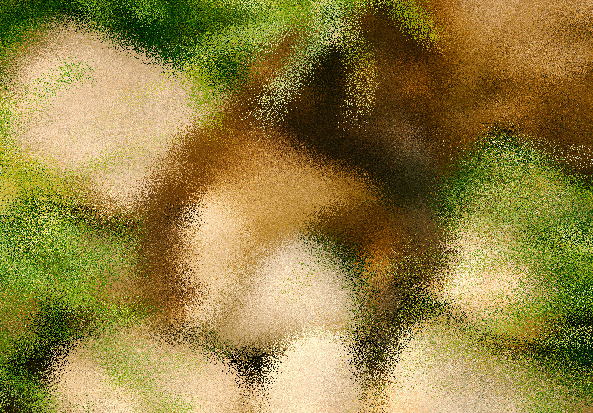
Check out some really quick example shaders being applied to a cool image of an otter.

Image

uniform sampler2D texture;

void main() {
vec4 pixel = texture2D(texture, gl_TexCoord[0].xy);
float gray = (pixel.r + pixel.g + pixel.b) / 3;

gl_FragColor = vec4(gray, gray, gray, pixel.a) * gl_Color;
}

Image

uniform sampler2D texture;

void main() {
vec4 pixel = texture2D(texture, gl_TexCoord[0].xy);

gl_FragColor = vec4(1 - pixel.r, 1 - pixel.g, 1 - pixel.b, pixel.a) * gl_Color;
}

Image

uniform sampler2D texture;

// A weird way to generate a random number with a vec2 seed I guess.
float rand(vec2 co){
return fract(sin(dot(co.xy ,vec2(12.9898,78.233))) * 43758.5453);
}

void main() {
vec2 samplePos = gl_TexCoord[0].xy;
samplePos.x += rand(samplePos) * 0.05;
samplePos.y += rand(samplePos) * 0.05;
vec4 pixel = texture2D(texture, samplePos);

gl_FragColor = pixel * gl_Color;
}
Shaders are the best!

Doodle Post

Image

Otter Example: Surfaces

Otter Example: Surfaces
Another Otter example has washed ashore. This one deals with understanding how to use Surfaces. Check out the full example right here to see how to make pretty pictures using Surfaces.

Image


Image


Surfaces are essentially just wrappers for a render texture. I like to think of them as canvases that can be drawn to. Otter by default uses one big Surface the size of the game window to render the game. Surfaces can be a great way to add something like a minimap or HUD to your game, or make use of shaders. I often use multiple surfaces when making my games so that I can zoom in and out on the main Surface and keep things on the HUD unaffected by the zooming.

Doodle Post

Image

Otter Example: Sound and Music

Otter Example: Sound and Music
Another Otter example coming fresh off the ovens! This one marks the 14th example, and covers playing sound and music using the framework. The full example is right here, and here's a glimpse at the codes:
using Otter;
using System;
using System.Collections.Generic;
using System.Linq;
using System.Text;
using System.Threading.Tasks;

namespace SoundStuff {
class Program {
static void Main(string[] args) {
// Create a Game.
var game = new Game("Sound and Music");
// Start the game with a new SoundScene.
game.Start(new SoundScene());
}
}

class SoundScene : Scene {
// Load the sounds into individual Sound objects.
public Sound SoundOne = new Sound("sound1.wav");
public Sound SoundTwo = new Sound("sound2.wav");
public Sound SoundThree = new Sound("sound3.wav");

// Load the music into a Music object.
public Music Music = new Music("music.ogg");

public override void Update() {
base.Update();

// Play sounds for the 1, 2, and 3 keys being pressed.
if (Input.KeyPressed(Key.Num1)) {
SoundOne.Play();
}
if (Input.KeyPressed(Key.Num2)) {
SoundTwo.Play();
}
if (Input.KeyPressed(Key.Num3)) {
SoundThree.Play();
}

// Pause or play the music on the spacebar being pressed.
if (Input.KeyPressed(Key.Space)) {
if (Music.IsPlaying) {
Music.Pause();
}
else {
Music.Play();
}
}

// Adjust the volume of the sounds with up and down keys.
if (Input.KeyDown(Key.Up)) {
Sound.GlobalVolume += 0.02f;
}
if (Input.KeyDown(Key.Down)) {
Sound.GlobalVolume -= 0.02f;
}

// Adjust the volume of the music with left and right keys.
if (Input.KeyDown(Key.Right)) {
Music.GlobalVolume += 0.02f;
}
if (Input.KeyDown(Key.Left)) {
Music.GlobalVolume -= 0.02f;
}
}
}
}
So easy!

Now there's almost nothing holding you back from making a video game using Otter if you so choose. There's still a handful of examples to go, but this one I believe marks the last in the series that is necessary to make a complete thing. Input, graphics, collision, and sound should cover a pretty large portion of making a game, right?

Otter Example: Ogmo Editor Levels

Otter Example: Ogmo Editor Levels
A new example for using my game making framework is now online! Check it out here!

Image


This Otter example goes over how to take levels made using Ogmo Editor and load them up for making games with them. The example code is actually pretty straight forward, I think!
using Otter;
using System;
using System.Collections.Generic;
using System.Linq;
using System.Text;
using System.Threading.Tasks;

namespace OgmoEditorStuff {
class Program {
static void Main(string[] args) {

// Create a new Game.
var game = new Game("Ogmo Editor Example");
// Set the background color to see stuff a little better.
game.Color = Color.Cyan;

// Create a new Scene to use for the Ogmo data.
var scene = new Scene();

// The path to the level to be loaded.
var pathLevel = "Level.oel";
// The path to the Ogmo Project to use when loading the level.
var pathProject = "OgmoProject.oep";

// Create a new OgmoProject using the .oep file.
var OgmoProject = new OgmoProject(pathProject);

// Ensure that the grid layer named "Solids" gets the Solid collision tag when loading.
OgmoProject.RegisterTag(Tags.Solid, "Solids");

// Load the level into the Scene.
OgmoProject.LoadLevelFromFile(pathLevel, scene);

// Start the game using the Scene with the loaded Ogmo Level.
game.Start(scene);
}
}

// Collision tags to use in the game.
enum Tags {
Solid,
Player,
Coin,
Exit
}

// A Player Entity to match the Entity in the Ogmo Project.
class Player : Entity {
public Player(float x, float y) : base(x, y) {
var img = Image.CreateRectangle(32, 32, Color.Red);
AddGraphic(img);
SetHitbox(32, 32, Tags.Player);
}
}

// A Coin Entity to match the Coin in the Ogmo Project.
class Coin : Entity {
public Coin(float x, float y) : base(x, y) {
var img = Image.CreateRectangle(16, 16, Color.Yellow);
AddGraphic(img);
SetHitbox(16, 16, Tags.Coin);

// Adjust the position here because of the Origin in the Ogmo Project.
X += 8;
Y += 8;
}
}

// An Exit Entity to match the Exit in the Ogmo Project.
class Exit : Entity {
public Exit(float x, float y) : base(x, y) {
var img = Image.CreateRectangle(64, 64, Color.Magenta);
AddGraphic(img);
SetHitbox(64, 64, Tags.Exit);
}
}
}
But you should check out the full example for yourself for more details.