I moved to a new URL! Check it out!

posts tagged with: gamedev

Dev Log: Building Buildings

Dev Log: Building Buildings
I'm finally getting back to work on my main project which for now is called Stratoforce. Maybe StratoForce? Strato Force? I dunno, who cares for now.

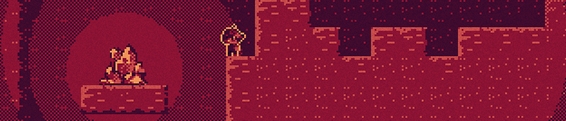
A big part of the game is placing structures onto islands that you build, and for whatever reason I've been totally stuck in how I should be designing the structures. I had a couple of images in the game for the basic Power Generator and Power Node structures, but I hated how it looked over time. They looked too complex, so I decided to try to dial it back to something way simpler with big simple shapes.

Image


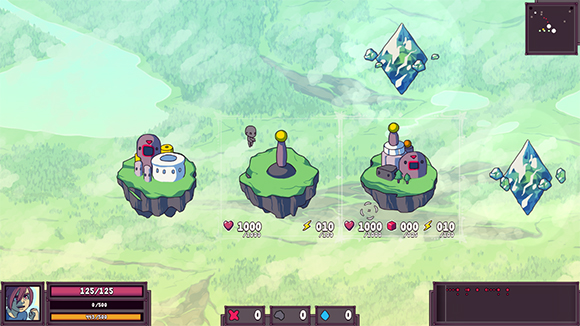
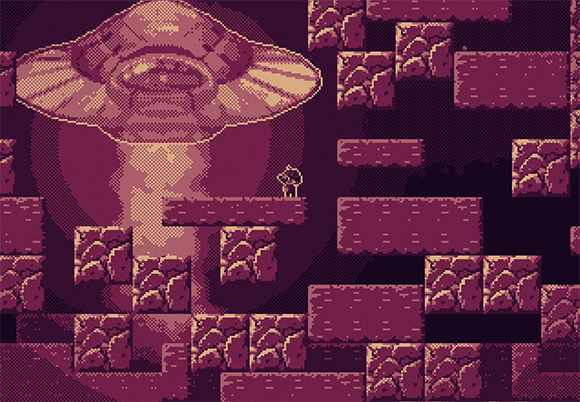
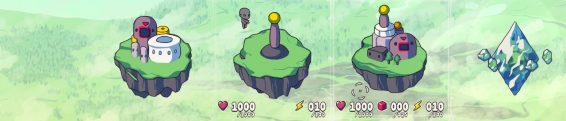
From left to right there's the Ammo Generator, the Power Node, and the Power Generator. I've been trying to find references for RTS structure and building design, but I found that a lot of them use 3d which is quite a bit different. I can see how this kind of thing would be waaay easier in 3d though. I do want to have my structures animate, and respond to things, and doing that in 2d is going to be a little challenging. I might be able to make something work with a bunch of tweens or something though... hopefully I'll be able to prototype some animation stuff for the structures soon!

Game Jam Procedural Generation Part IV

Game Jam Procedural Generation Part IV
The final part of this series about procedural generation for Starforger II will conclude with the last of the level generation code. In the last episode I talked about some of the details in generating rooms, tunnels, and other details in the level. In this final part I'll wrap it up by talking about how I place enemies, breakable blocks, and some final touches on the treasure room.

Image


The next thing in the generation of the level is the breakable blocks. These are blocks that the player can blow up using their bombs. I added these sort of at the last minute of the jam just to give some more interaction with the world, and it felt kinda fun to forge your own path through a big section of breakable blocks.

// put breakable blocks in random places I dunno
for (var yy = 10; yy < grid.TileRows; yy++) {
for (var xx = 0; xx < grid.TileColumns; xx++) {
if (CheckRect(xx, yy, 2, 2)) {
continue;
}
if (Rand.Chance(config.BreakableChance)) {
if (breakables < breakablesMax) {
Scene.Add(new BreakableBlock(xx * 16, yy * 16));
gridBreakable.SetRect(xx, yy, 2, 2);
breakables++;
}
if (config.Width > 1500) {
xx++;
}
if (config.Width > 1000) {
xx++;
}
}
}
}

I actually use a separate grid "gridBreakable" to keep track of where I've already placed blocks. This is less expensive in Otter. The alternative would be to do a collision check against all other breakable blocks which would take longer and longer if there are more breakable blocks being added. Whenever a block is added I add a 2 x 2 rectangle to the gridBreakable grid, and the function CheckRect() will check against the breakable grid and the ground grid, so I can't accidentally place a breakable block in the ground, or overlapping another breakable block.

Game Jam Procedural Generation Part II

Game Jam Procedural Generation Part II
In the last episode of Game Jam Procedural Generation I talked about the "outer layer" of my procedural generation code for my yet to be released game jam game. After the outer layer of stuff has been generated, that can be used to inform the "inner layer" of the procedural generation. So the outer layer in this case is the galaxy that the player can explore in their ship, and the inner layer is the actual side scrolling platformer level that they will explore.

Image


Where do we even begin? First keep in mind that I'm using Otter for all of this stuff, so if you see functions and code that looks totally unfamiliar, it's probably an Otter thing. Also keep in mind that all of this code was written during a 48 hour game jam, so it ain't pretty. I'm just going to be sharing big snippets of code and hopefully try to explain what is happening in each one.

In the last step I talked about how I create a config object to hold all of the possible fields that will be used to generate the level. Here's what that looks like:
class ScenePlatformingConfig {
public int Width;
public int Height;

public int ShipStartOffset;

public int TreasureDirection;
public int TreasureDistanceOffset;

public int GroundLevelOffset;

public bool Explored;
public bool Pillaged;

public int Jagginess;

public int Platforms;

public int DecaySpots;
public int DecayChance;

public int IslandSpots;
public int IslandSize;

public int Rooms;

public string Name;

public int BreakableChance;

public int CreatureChance;
}

Pretty straight forward. Just a simple class that will hold a bunch of values that can be then passed to the classes that generate the platforming level.

Zublax Episode 7

Zublax Episode 7
I recently sat down with some Phoenix area game developer buddies for our "weekly" podcast about game design stuff. This time we talked about randomness in games and how different types of randomness can influence a game's design.

The full episode is available here!

Game Jam Procedural Generation Part I

Game Jam Procedural Generation Part I
My latest game jam game still isn't quite ready for release, and unfortunately at this point it will have to wait until after PAX, but I can still share some source code from it that will maybe help people out when it comes to procedurally generating things in their games.

The premise of my jam game is that you play as a space explorer type person who is flying a ship around the galaxy searching for planets with shiny ore on them. When the game starts the entire galaxy is procedurally generated. This is a fancy way in saying that a bunch of random things happen and hopefully it works out.
for (var i = 0; i < 99; i++) {
var size = Rand.Int(8, 64);
planetSupply -= size;
if (planetSupply <= 0) {
size = 8;
}
var x = Rand.Float(Width);
var y = Rand.Float(Height);
var d = new Destination(x, y, size);

Add(d);

while (d.CloseToOtherDestination()) {
d.X = Rand.Float(Width);
d.Y = Rand.Float(Height);
}
}

This is my CreatePlanets() function for the map scene in the game. What this does is just creates 99 planets and places them in the scene at random X and Y coordinates. The map scene has a Width and Height defined earlier in the game (in this case I believe its 5000 x 5000 pixels.)

The scene also has a planetSupply field that is defined earlier. Whenever a planet is generated, its size is subtracted from the planetSupply. If the planetSupply is less or equal to 0, all planets created from that point on will be the smallest possible size. This was to control how many huge planets were created in the scene.

Dev Log: Game Jammin

Dev Log: Game Jammin
Over the weekend I went to a local game jam in Phoenix. I haven't jammed since November and this was another cool opportunity to put Otter to the test!

The game isn't quite ready for release, but here are a few screen shots of it for now:

Image


Image


Image


Image


And you can see some of it in motion right here.

This jam I decided that I wanted to really limit myself in terms of art so I could spend more time on more stuff in the game. I wanted to restrict myself to a game boy palette, so my first thought was to go for a shader. I ended up getting a shader up and running really quickly that emulates sort of a game boy look. Here's the shader code:
#version 130
uniform sampler2D texture;
uniform sampler2D palette;
uniform float shift;
uniform float offset;

float rand(vec2 co){
return fract(sin(dot(co.xy ,vec2(12.9898,78.233))) * 43758.5453);
}

void main() {
vec2 pixpos = gl_TexCoord[0].xy;
vec4 pixcol = texture2D(texture, pixpos);

float gray = (pixcol.r + pixcol.g + pixcol.b) / 3;

gray = round(gray / 0.25) * 0.25;

gray += (rand(pixpos + offset) * 2 - 1) * 0.03;

pixcol = texture2D(palette, vec2(gray, shift));

gl_FragColor = pixcol * gl_Color;
}

The shader also does some extra stuff like randomly generates a very faint noise over the entire screen. I couldn't figure out how to make the noise scale with the screen though, so if you are playing with the screen scale at 2x or 4x or whatever the noise will still be every 1 pixel.

The shader also needs a palette to go with it that is passed in through the palette parameter. You can also shift the palette up and down on the texture. Here's the palette file I used:

Image


When the game starts it's using the palette from left to right on the very top of the image. The shift parameter in the shader can be used to read colors from anywhere on the y axis on the image, so if I want to make the game use the blue palette on the bottom I can set the shift to 1. (Texture coordinates are 0 to 1 in shader land.) The shader also reduces the amount of colors with some division and rounding.

The last thing I did to help out with the shader is add a full screen dither texture to the game. This is actually being rendered in the game and not in the shader. It's a very very faint texture of black and white pixels overlaid on the screen at an alpha of 10%. This will add a dithering look between all of the main colors of the palette. This idea was inspired by Dan Fessler's HD Index Painting tutorial. (Actually most of this shader was inspired by that tutorial!)

I think that covers everything with the shader. Hopefully soon I can release the game itself. Just need to fix some bugs and fix some sound issues first. I ended up getting awards in the technical, art, and design categories, and overall I got 2nd place at the jam which is pretty cool!